 I like to read the Micro / Small Layouts website from time-to-time. I'm always impressed with what people are doing with small footprint layouts. The timesaver track design I've used is a fairly common track plan in these railroads. So, in some ways, even though my layout is 6 feet by 5 feet, I often think of it as having a kinship with layouts seen on Micro / Small Layouts.
When I saw this picture of NASA's launch pad 5 for the Mercury project (it's a NASA photo) it sort of jumped out as being a good candidate for a micro-layout of some sort. I really need to try and design something based on this great photo. It would probably have a launch pad or two at one end, and some sort of vehicle preparation building or facility at the other. I'm sure if E.L. Moore were designing it, it would no doubt have the ability to launch rockets with much attendant smoke and fireworks :-) I've also got this kit of Jupiter "C" rocket in my stash that I bought a couple of years ago that I'd want to work into the design. It's in 1/110 scale, which makes it a little small for HO (1/87) and much too big for big for N (1/160). If it was used with small diesel switchers and other small freight cars, I don't think it would look too out-of-place on an HO-scale micro-layout.
The rocket itself looks very easy to build, but the railcar gantry that straddles two parallel tracks looks much more interesting. I suspect with a little modification this could be turned into a functioning HO-scale car.
E.L. Moore used a VW-based flatbed, pickup truck model as a photo prop in three of his construction articles - there may be more, my survey was certainly unscientific - from the 1970s. The composite picture below shows it (from left to right) at Bunn's Feed & Seed in the August '73 issue of Model Railroader, Jones' Chemical Co. in the March '74 issue of Model Railroader, and the RMC Paper Company in the April '74 issue of Model Railroad Craftsman (I built the paper company way back then using some unusual methods, hopefully I'll have a post on it in the future). It turns out that in the Bunn's article Mr. Moore used the VW as a prop, in different poses, in three separate photos.

Since I'm building an E.L. Moore industrial park to showcase the Bunn's Feed & Seed Plant and Jones' Chemical Co., I thought it right to include one of those VW flatbeds. I guess if I searched the internet enough I probably could have found one ready-made; however, I had two Model Power VW buses on hand that I bought awhile back at a local hobby shop, so I thought I'd try to convert one. Turns out it was relatively easy and fun.
The bus comes apart easily: it's only held together by pieces that snap together, so careful prying on the chassis will get the model to fall apart.
I used a Dremel with a cutting wheel, a small hacksaw, and some files to cut off the back of the bus and square it up to the final shape. Before cutting I drew some lines on the bus with a fine, black Sharpie pen so there were some guidelines to cut along.
A new back wall for the cab was cut from 0.020 inch styrene sheet and glued to the metal cab with thick superglue. A file was used to do some final shaping on the back wall once the glue was set in order to blend the metal cab and plastic wall. The joint line between the back wall and the cab was then filled and sanded to achieve the final shape.
And no, there is no rear window on the cab even though it looks like Mr. Moore's had one. No doubt his was a commercial product, and more-or-less modeled a real prototype that included a rear window to make it street legal. To be honest, I didn't think I had the skill to cut a clean, square window, so I deliberately left it off. However, I forgot to remove the rearview mirror from the cab, so maybe the driver has x-ray vision :)
The wood flatbed was made from a piece of 1/8 inch balsa and scored to make it look like it's composed of individual boards. It too was glued in place with some thick superglue.
These Model Power HO scale vehicles have a molding on the chassis to screw the item securely to its packaging. Often these extend into the field-of-view when the model is on display on the railroad - they look unsightly and grossly unrealistic. I used the Dremel to grind it off the bus chassis. I didn't fix up the chassis afterward, since it's never seen when the vehicle is on display.

I lost the headlights during the disassembly procedure. To recover, I filled the headlight holes with white glue since it dries near clear. The resulting new headlights aren't perfect, but they're not bad.
The body was painted with Model Master Acryl Dark Green that I had leftover from the Dodge AT-AT project I finished a couple of months back. I don't know what colour Mr. Moore's was, but dark green seemed right. The flatbed is painted with a loose wash of thinned flat black and brown paint. The cab interior was painted a tan colour, and the steering wheel was painted black and silver. To finish off, the entire vehicle was painted with a loose wash of thinned flat black to tone things down and add a little definition.
The Ontario license plates are items from Penitentiary Productions that I bought last year at George's Trains. If you follow their instructions on the package, they go on quite well and look good.
Now, I just need to locate some of the figures Mr. Moore used in the photos to complete the scene. That'll be tough.

 This is the first page of a four page article entitled "Lunar railroad you can model", by Alan Cerny and Bob Hayden, that appeared in the April 1978 issue of Model Railroader magazine. No doubt it was probably meant as something of an April Fool's joke, but it was a well thoughtout concept, complete with detailed drawings and 3/8-inch scale models of a locomotive and freight car, for a model of a railroad on the Moon. I was mightly impressed at the time this was published, and it was always inspirational in all things to do with space modeling. This was certainly in mind while building Moonscope and the Lunar Postal Vehicle. Yeah, not much here to do with model railroading other than I came across this issue of MR while moving and reorganizing things around the house. I think I spent more time thumbing through old issues of model building magazines than actually moving stuff :-)
 This lookout station is built primarily from the leftover cab from the AMT/Ertl 1/24 scale Li'll Gaser kit that was used to build Li'l Aqua and some Buddha figures bought at a nearby Japanese gifts store (although, figures of this sort can be bought at just about any Chinese variety and gift store).
 The Li'l Aqua project used the back end of the Li'l Gasser kit, and the front end got relegated to my spares box.
 The base was made from 0.080 inch sheet styrene, and everything - base, structure and Buddhas - was painted with PolyScale concrete coloured acrylic paint. Some loose washes of gray, black and rust coloured painted were then applied to add some visual interest.
 The skylight, circular basement viewing port, and balcony are castings from the Tichy Train Group. I bought an assortment box of HO building details from Tichy last year, and it has come in handy in supplying parts for a variety of projects. The inside and outside ladders are items from Plastistruct.
 The couch is built-up from styrene scraps and is meant to be in a modern, mid-century, 1950s-esque style. The abstract art on the inside back wall was cut from a much larger watercolour painting that didnít quite work out as planned. That little square is probably the best part :-) Before mounting, it was framed with some styrene right-angle stock painted an aluminum colour.
 Why this building? I don't know. I seemed to have gotten on a path of looking at my leftover kit parts box in terms of what sort of HO-scale building I could make from the stuff it contained. Rummaging and thinking caused some ideas to flash. This is one of them.
 I didn't have the complete idea at the beginning of the project, only that the cab could be the basis of a building, and I thought the size of the Buddhas made them good for incorporating into some kind of HO-scale model. I tend to work a lot like that: ideas develop while I'm actually working with parts.
 Although, I was attracted to the cab as a starting point because - as I mentioned in an earlier post - it allowed for the viewer to look inside and see what was going on. I think this was the only preconceived idea I brought to the project.

 This single-stall engine house was built based on an article that ran in the March 1977 issue of Model Railroader magazine: An enginehouse for the CT&C, by Pat Ford. It was actually a construction article for an N-scale structure, but I liked it and decided to scale it up to HO. I think I started building it soon after the article was published.
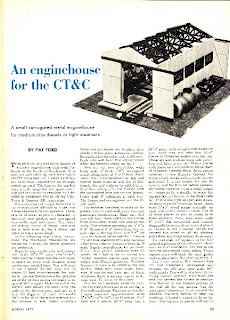 As you can see, the results are mixed, but I think it has its own charm with the attempt at a detailed interior. The roofless structure in the article’s opening page that allowed a view to the interior was what attracted me to this project. My interior and structure was crude, but it’s a interesting attempt.
 I’m still attracted by the idea of being able to look into and through a model. I recently finished the Overlook building and part of the attraction in building it was the possibilities it allowed for a viewable interior - hopefully, I’ll get some photos posted soon. I played with this idea a bit in model spacecraft too - with the Age of Discovery I wanted to be able to look into the ship, and in that project it took the form of a viewable shuttle-bay. I've still got the itch for looking into things, but I’m not sure where it might go from here; maybe a spacecraft with dual shuttle-bays so the viewer can look into them and through them into the ship - who knows.
 The enginehouse was also my first try at using E.L. Moore’s method for making metal panels from paper- the very same method I tried 30 years later in the Bunn's Feed & Seed and Jones' Chemical Company projects. However, I left out a very important step when I built this engine house: I didn’t actually emboss the corrugations over a form, but merely ran a ball-point pen over the paper. This gives a very limited effect, and doesn’t do justice to Mr. Moore’s method: the corrugations appear very flat. Back then I didn’t have any readily available sources for a suitable embossing form as I do today.
 I don’t think this engine house will appear on the layout. It’s still parked on the shelf for now.
 It’s been hectic lately and I haven’t done much building or posting. To help get back into the swing of things I thought I’d post a few pictures of some scratchbuilt structures I did back in the ‘70s - well, I’ll post pictures of the ones that have survived.
 Back in the day, my output was high, but the quality was low, probably due to inexperience, youthful exuberance, and maybe my choice of materials, which tended to wood, paper, and card since they were cheap and readily available. Of the ones that have remained, this is one of my favourites.
 This depot appeared as an article in the August 1975 issue of Railroad Model Craftsman called “On modeling the depot at Mineral City...” by Karl Naffin. For some reason I really liked the accompanying drawings and decided to build it; however, I was quite liberal in my interpretation of Mr. Naffin’s suggestions and recommendations on construction.
 I guess the thing that really dates this model - and me for that matter - is that all the siding and trim was made from used IBM computer punch cards my father brought home from work. I remember that it was very tedious cutting and gluing that siding to the structure. The tar paper roof is made from strips of masking tape, as are the window frames.
 The walls and roof are cut from regular craft-store bristol board and reinforced with 1/4-inch square balsa wood. Their inside surfaces were coated with shellac to help keep them from absorbing moisture - it seems to have done the job.
 Hopefully, this station will find a place on the new railroad.


